
Installing a dimmer switch means replacing a standard light switch with one that lets you adjust brightness. For a single-pole switch on a simple circuit with compatible bulbs, an experienced DIYer can often complete the job in under an hour. It is still electrical work, though. A missed live wire, an incompatible dimmer, or older wiring behind the wall can lead to shocks, damaged fixtures, or a fire risk. Here is how to choose the right dimmer, what the installation involves, the warning signs that mean you should stop, and when it is safer to have a licensed Rite Way electrician handle it.
Key Takeaways
- A dimmer switch replaces a standard switch and must match both the circuit type and the bulbs it controls.
- Check that your bulbs are labeled dimmable before purchasing a dimmer.
- Always verify the power is completely off with a non-contact voltage tester before touching any wires.
- Several conditions in the box are reasons to stop and call a licensed electrician rather than continue.
- In Tucson, where many homes were built before 1980, older wiring adds a layer of risk worth taking seriously.
Should You Install a Dimmer Switch Yourself?
A straightforward dimmer swap on a single-pole circuit is a common DIY project, but it still carries risk. Before starting, be honest with yourself about the following:
- Have you safely replaced a switch or outlet before?
- Do you own a non-contact voltage tester and know how to use it?
- Is this a single-pole switch, meaning one switch controls the light?
- Are your bulbs labeled as dimmable?
- Is the wiring in your home relatively modern, with no visible signs of age or damage?
If you answered no to any of these, or aren’t sure, calling a licensed electrician is the right move. Rite Way’s licensed electricians handle switch and outlet work every day and can install the dimmer and check the circuit at the same time.
Choosing the Right Dimmer Switch
Most dimmer problems start with the wrong product. Here is what to match before you buy.
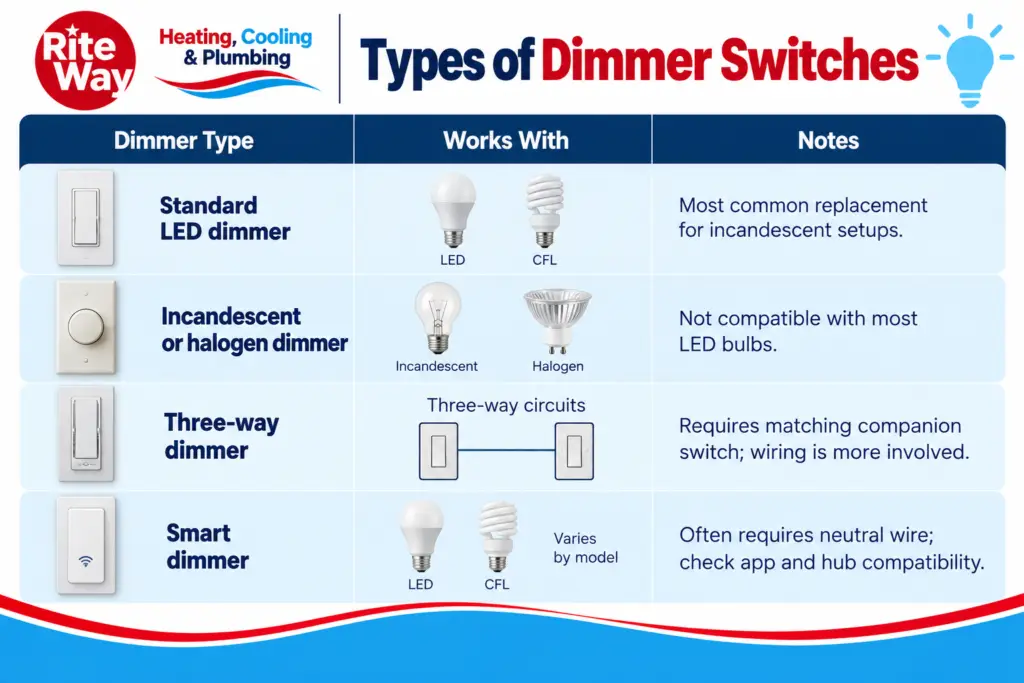
Match the Dimmer to Your Bulbs
Dimmers are designed for specific bulb types. LED bulbs require an LED-compatible dimmer. Not all LED bulbs are dimmable, so look for “dimmable” on the bulb packaging before purchasing. Using an incompatible dimmer with LED bulbs causes flickering, buzzing, and shortened bulb life.
Check the Wattage Rating
Every dimmer has a maximum wattage rating. Add up the wattage of all the bulbs the switch controls and confirm the total falls within the dimmer’s rated capacity. For multiple dimmers installed side by side in the same box, the manufacturer’s instructions often require derating, meaning the maximum load per dimmer is reduced. Follow those instructions exactly.
Single-Pole vs. Three-Way
A single-pole dimmer replaces a switch that controls a light from one location. A three-way dimmer replaces one of the switches in a setup where two switches control the same light, such as at the top and bottom of a staircase. Three-way wiring is more complex. If you are working with a three-way setup and your wiring does not clearly match the manufacturer’s diagram, this is electrician territory.
Smart Dimmers and Neutral Wires
Many smart dimmers require a neutral wire in the box. Older homes often do not have one at the switch location. A missing neutral is not something to work around with a product substitution. A licensed electrician can evaluate your options safely.
What You Will Need
Before starting, gather the following:
- A dimmer compatible with your circuit type and bulbs
- A non-contact voltage tester (and a known live outlet to confirm it is working before you rely on it)
- A flathead and a Phillips screwdriver
- Wire nuts if not included with the dimmer
- The manufacturer’s instruction sheet for your specific dimmer model
Read the instruction sheet before you start. Every dimmer model is wired slightly differently, and the diagram in the box is the authoritative guide.
How to Install a Dimmer Switch: What the Job Involves
The following describes what this job involves at a general level. Follow your dimmer’s instruction sheet for the actual wiring diagram. If anything in your box does not match what you see there, stop.
Step 1: Turn off the correct breaker.
Go to your electrical panel and turn off the breaker that controls the light you are working on. Do not assume a breaker is off because the light went out. Label the breaker so no one turns it back on while you are working.
Step 2: Test your tester, then verify every wire is dead.
First, confirm your non-contact voltage tester is functioning by holding it near a known live outlet. Then hold it near every wire in the switch box. If it reads live on any wire after the breaker is off, stop. Either you have the wrong breaker or there is more than one circuit in the box. Do not proceed. Call a licensed electrician.
Step 3: Remove the cover plate and old switch. Look before you disconnect anything.
Take a clear photo of the existing wiring before removing any wires. Note how many wires are in the box, their colors, and where they connect. If you see anything that does not look like standard modern wiring, or if there are more wires than the dimmer diagram accounts for, stop and call a licensed electrician.
Step 4: Check for stop signs.
Before disconnecting anything, look for the conditions listed in the next section. If any apply, stop and call a licensed electrician.
Step 5: Connect the dimmer according to the manufacturer’s diagram.
Connect wires exactly as shown in the instructions. If your dimmer has a ground wire, connect it to the ground in the box. Do not skip the ground connection. Carefully fold the wires into the box without pinching them, then mount the dimmer.
Step 6: Attach the cover plate and restore power.
Restore the breaker and test the dimmer. After a few minutes of operation, feel the cover plate. A slight warmth can be normal for many dimmers, but if it is hot to the touch, turn off the breaker and call a licensed electrician.
Rather not work with live wiring? Rite Way’s licensed electricians can install your dimmer and check the circuit while they are there.
Stop and Call an Electrician If You See Any of These
At any point during the job, stop and call a licensed electrician if you notice:
- Power still reads live on any wire after turning off the breaker
- More than one circuit running through the box
- Wires that are a dull silver color rather than bright copper, which may indicate aluminum branch-circuit wiring
- Scorched, brittle, or cloth-covered insulation on any wire
- No ground wire in the box
- The box is overcrowded or the wiring looks damaged
- A three-way or four-way circuit setup you are not sure how to handle
- A smart dimmer that needs a neutral wire you do not have
- The switch or plate feels hot after installation
- Flickering or buzzing that a compatible dimmable bulb does not resolve
Do not try to work around any of these. Each one is a reason to stop.
Older Homes Need Extra Care
Tucson’s median home was built in 1979, which means many homes have decades-old wiring and devices. One concern specific to homes built from the mid-1960s to the early 1970s is aluminum branch-circuit wiring. Aluminum wiring can overheat at connection points over time, and switching devices on these circuits require specific connectors and methods that a licensed electrician should handle.
If you are not sure what type of wiring is in your home or when it was last inspected, a Rite Way electrical inspection reviews your wiring, breakers, and connections and tells you exactly what you are working with. See also our post on arc fault breakers, which covers the added protection modern breakers provide in older homes.
Dimmer Flickering, Buzzing, or Getting Warm?
The most common cause of flickering and buzzing after a dimmer installation is a compatibility issue between the dimmer and the bulbs. Confirm the bulbs are labeled dimmable and that the dimmer is rated for your bulb type. Replacing one bulb at a time with a known compatible dimmable LED is a good way to isolate the problem.
A dimmer running slightly warm is normal for many models. Check your instruction sheet for the manufacturer’s expected temperature range. A dimmer that is hot to the touch, discolored, or producing a burning smell is a different situation entirely. Turn off the breaker immediately and call Rite Way for electrical troubleshooting. Do not use the switch until it has been evaluated.
If flickering or buzzing continues with compatible bulbs in place, Rite Way can troubleshoot the switch and your home’s wiring.
Permits and Hiring a Licensed Electrician in Arizona
Electrical work requirements vary by city and county in Arizona. Some switch replacements qualify as minor repair work; others may require a permit. If you’re unsure, check with your local building department before you start. Rules change, so confirm before the work begins rather than after.
If you hire someone for electrical work in Arizona, verify they hold an active ROC license. Rite Way publishes its ROC license information and knows local permitting requirements across Tucson and Southern Arizona.
Licensed. Local. Ready to Help.
Rite Way’s licensed electricians handle switches, outlets, wiring, and panels across Tucson and Southern Arizona. Whether you want a dimmer installed correctly the first time, need an electrical inspection on an older home, or have a wiring concern that needs a professional set of eyes, we give you honest options and upfront pricing before any work begins. We’ve served Arizona homeowners since 1959 and answer phones 24/7. Schedule electrical service.